だいぶ前にGitHubのアカウントは作成していたもののこれまでちゃんと使ってみたことはなかった。
しかし今回BEAR.Sundayを勉強しはじめてtypoを発見したり解決できない問題にぶちあたったりとしている状況の中pull requestやらissueのopenやらをやってみた。
その際に以下のサイトを参考にさせていただいた。
まだGitをちゃんと使えるようになれていないし、GitHubについてもわからないことだらけではあるものの今回思ったことは、「手を動かしてみないとなにも理解できない。」ということだった。
2012年7月12日木曜日
2012年7月10日火曜日
BEAR.Sundayのphpunitの実行
先日からいじりはじめたBEAR.Sundayにはしっかりとunittestが書かれており動作確認の意味でもこのテストの実行はとても重要なものだと思われる。先日もインストール後にはphpunitを実行してオールグリーンを確認していた。
BEAR.Sundayのことを教えてくれたNEKOGETさんがmysqlのrootにパスワードが設定してあるとテストが通らないということを云ってたのでちょっと調べてみた。
2012/7/12 追記
※ MySQLのrootにパスワードが設定されている場合の対処法が本体の方で修正が入りました。
http://code.google.com/p/bearsunday/wiki/Install をご参照ください。
ざくっと上記7つのファイルに対してrootのパスワードを設定しないとphpunitがEとSの嵐になってしまう。
前者5つは"password"後者2つは'password'という形での設定が必要となるようだ。
私はmysqlにまったくもって慣れていないのでrootのパスワードの設定やパスワードリセットに苦労したのは云うまでもないw
ちなみにmysqlのrootパスワードの設定方法は
のような感じで行う。
またパスワードクリアについては
な感じでいけるので備忘録。
BEAR.Sundayのことを教えてくれたNEKOGETさんがmysqlのrootにパスワードが設定してあるとテストが通らないということを云ってたのでちょっと調べてみた。
2012/7/12 追記
※ MySQLのrootにパスワードが設定されている場合の対処法が本体の方で修正が入りました。
http://code.google.com/p/bearsunday/wiki/Install をご参照ください。
./tests/PagingQueryTest.php:        $this->pdo = new \PDO("mysql:host=localhost; dbname=blogbeartest", "root", "");
./tests/PagerTest.php:        $this->pdo = new \PDO("mysql:host=localhost; dbname=blogbeartest", "root", "");
./tests/DoctrineDbalAdapterTest.php:        $this->pdo = new \PDO("mysql:host=localhost; dbname=blogbeartest", "root", "");
./apps/sandbox/tests/PageBlogPostsTest.php:        $pdo = new \PDO("mysql:host=localhost; dbname=blogbeartest", "root", "");
./apps/sandbox/tests/AppPostsTest.php:        $pdo = new \PDO("mysql:host=localhost; dbname=blogbeartest", "root", "");

./sandbox/scripts/test.config.php:        'password' => null,
./sandbox/scripts/test.config.php:        'password' => null,
ざくっと上記7つのファイルに対してrootのパスワードを設定しないとphpunitがEとSの嵐になってしまう。
前者5つは"password"後者2つは'password'という形での設定が必要となるようだ。
私はmysqlにまったくもって慣れていないのでrootのパスワードの設定やパスワードリセットに苦労したのは云うまでもないw
ちなみにmysqlのrootパスワードの設定方法は
# mysql

mysql> SET PASSWORD FOR root@localhost=PASSWORD('hoge');
Query OK, 0 rows affected (0.00 sec)

mysql> quit
のような感じで行う。
またパスワードクリアについては
# killall mysqld
# /usr/bin/mysqld_safe --user=root --skip-grant-tables & mysql mysql

mysql> update user set Password=null where Host='localhost' and User='root';
mysql> quit

# /etc/rc.d/init.d/mysqld restart
な感じでいけるので備忘録。
2012年7月9日月曜日
BEAR.Sundayをインストールしてみた。(1)
NEKOGETさんからおもしろそうと勧められたPHPのフレームワークBEAR.Sundayを試してみる。
当初Ubuntuにインストールを試みたのだが途中からcomposerによる外部ライブラリのインストールが上手くいかなくなってしまいFedora17に入れてみた。
Fedora-17-x86_64-DVD.isoをVMWare環境にインストールを敢行。
○仮想マシン設定
メモリ2GB
プロセッサ4コア Intel VT-x/EPTまたはAMD-V/RVIを仮想化にチェック
ネットワークアダプタ ブリッジ
ディスク 20GB
CD/DVDにisoイメージをマウント
ディスプレイモニタ設定を指定 解像度1024x768
ディスプレイモニタを指定しないとFedoraのインストーラ下部のボタンが表示されなかった。
パッケージ選択でソフトウエア開発のデフォルトインストールを行ないGnome環境を構築。
vmware-toolsをインストールしyum updateを実行し最新環境に再起動。
Fedora17のベース環境が出来たところでapache2やmysqlそして必要なパッケージを導入しておく。
curlでcomposerのインストーラを取得してphpコマンドに渡しcomposer.pharをインストールした。
sandboxアプリのtmp, logディレクトリの権限を変更しておきます。
auto_discoverをonにして 新規チャネルを自動的に探すように設定。
アプリ用DB blogbearとテスト用DB blogbeartestをCREATEする。

起動時に指定したweb.phpがhttp://localhost:8088/へのアクセスで表示される。ページ内にあるリンクからHelloworldを表示する。

ちゃんとHelloWorldページが表示された。


最後に記事編集画面。新規ページと供用されていると思われる。
以上BEAR.Sundayをgithubから取得しphpunitテストを実行して確認。実際にビルトインサーバにブラウザからアクセスして表示等を確認した。
PHPはかなり不慣れで戸惑う場面も多かったしまだ納得いってない挙動もあるが同様にUbuntu12.04やDebian Wheezy(現testing)でも環境を構築してみたので随時記事にしたいと思う。
当初Ubuntuにインストールを試みたのだが途中からcomposerによる外部ライブラリのインストールが上手くいかなくなってしまいFedora17に入れてみた。
Fedora-17-x86_64-DVD.isoをVMWare環境にインストールを敢行。
○仮想マシン設定
メモリ2GB
プロセッサ4コア Intel VT-x/EPTまたはAMD-V/RVIを仮想化にチェック
ネットワークアダプタ ブリッジ
ディスク 20GB
CD/DVDにisoイメージをマウント
ディスプレイモニタ設定を指定 解像度1024x768
ディスプレイモニタを指定しないとFedoraのインストーラ下部のボタンが表示されなかった。
パッケージ選択でソフトウエア開発のデフォルトインストールを行ないGnome環境を構築。
vmware-toolsをインストールしyum updateを実行し最新環境に再起動。
Fedora17のベース環境が出来たところでapache2やmysqlそして必要なパッケージを導入しておく。
$ sudo yum install httpd mysql-server git curlapache2とmysql-serverを起動し、自動起動の設定を行い動作確認。
$ sudo systemctl start httpd.service
$ sudo systemctl enable httpd.service
ln -s '/usr/lib/systemd/system/httpd.service' '/etc/systemd/system/multi-user.target.wants/httpd.service'
$ sudo systemctl start mysqld.service
$ sudo systemctl enable mysqld.service
ln -s '/usr/lib/systemd/system/mysqld.service' '/etc/systemd/system/multi-user.target.wants/mysqld.service'
php関係のパッケージを導入。以下のものでおそらく事足りるかと思われる。
$ sudo yum install php php-mbstring php-pear php-pecl-apc php-xml php-mysql php-pecl-xhprofそしてphp.iniを編集。
$sudo vi /etc/php.ini

default_charser = UTF-8
date.timezone = Asia/Tokyo

mbstring.language = Japanese
mbstring.internal_encoding = UTF-8
mbstring.http_input = pass
mbstring.http_output = pass
mbstring.encoding_translation = Off
bstring.detect_order = auto
mbstring.substitute_character = none;
bstring.func_overload = 0
mbstring.http_output_conv_mimetype=

apc.enable_cli = 1
xhprof.output_dir = /tmp
上記を設定し、phpのバージョンを確認。
$ php -v
PHP 5.4.4 (cli) (built: Jun 14 2012 17:00:36)
Copyright (c) 1997-2012 The PHP Group
Zend Engine v2.4.0, Copyright (c) 1998-2012 Zend Technologies
ホームディレクトリにとりあえずBEARディレクトリを作成してgithubよりclone。
$ mkdir BEAR
$ cd BEAR/
$ git clone git://github.com/koriym/BEAR.Sunday.git
Cloning into 'BEAR.Sunday'...
remote: Counting objects: 5747, done.
remote: Compressing objects: 100% (1923/1923), done.
remote: Total 5747 (delta 2891), reused 5720 (delta 2864)
Receiving objects: 100% (5747/5747), 2.76 MiB | 69 KiB/s, done.
Resolving deltas: 100% (2891/2891), done.
composerのインストールでの変化を確認するためにディレクトリ構造を保存しておいた。
curlでcomposerのインストーラを取得してphpコマンドに渡しcomposer.pharをインストールした。
$ ls -R BEAR.Sunday >List1
$ cd BEAR.Sunday
$ curl -s http://getcomposer.org/installer | php
#!/usr/bin/env php
All settings correct for using Composer
Downloading...

Composer successfully installed to: /home/shige/BEAR/BEAR.Sunday/composer.phar
Use it: php composer.phar
composerのインストール前とインストール後での違いを見るとcomposer.pharファイルのみが導入されていることが確認できた。
$ cd ../
$ ls -R BEAR.Sunday >List2
$ diff List1 List2
6a7
> composer.phar
導入したcomposerを利用して外部ライブラリを導入する。
$ cd BEAR.Sunday
$ ./composer.phar install
Installing dependencies
  - Installing aura/autoload (dev-master)
    Cloning 1b8028cd301a8c95da7f0b1725bbf4fc8a495529

  - Installing aura/router (dev-master)
    Cloning 9b7cceaf1914214ac615cf1697f39d4f4f71e52d

  - Installing aura/web (dev-master)
    Cloning 111c884927e597f25fe8e14bf2d32860469b3730

  - Installing monolog/monolog (1.1.0)
    Downloading: 100%

  - Installing symfony/event-dispatcher (v2.0.15)
    Downloading: 100%

  - Installing guzzle/guzzle (v2.7.2)
    Downloading: 100%

  - Installing facebook/xhprof (0.9.2)
    Downloading: 100%

  - Installing aura/di (dev-master)
    Cloning 2bc8695f2efe040935e461f8fa945fc73ebbfe11

  - Installing doctrine/common (dev-master)
    Cloning b3afbb80506d909743475c5b0904285ab0c07941

  - Installing ray/aop (dev-master)
    Cloning e7e5125f829130c716bd797b389cf4c5e3f8c2fd

  - Installing ray/di (dev-master)
    Cloning 460bb44f25742147becd22a3afd8b1b92d3183a0

  - Installing aura/signal (dev-master)
    Cloning 501f622f7905a5b42f98265937e84c02db6e78bd

  - Installing bear/resource (dev-master)
    Cloning ae5acc46be3aa39241067e613f6e1b7edbf27a8b

  - Installing doctrine/dbal (dev-master)
    Cloning 78dbf28923059545b24ba753c112560ad59ca89e

  - Installing pagerfanta/pagerfanta (dev-master)
    Cloning c490684def33e992241e7fad33bcbd03d9d18643

  - Installing vdump/vdump (0.1.0)
    Downloading: 100%

  - Installing smarty/smarty (v3.1.11)
    Checking out /tags/v3.1.11/@4636

  - Installing symfony/console (v2.0.15)
    Downloading: 100%

  - Installing symfony/http-foundation (v2.0.15)
    Downloading: 100%

monolog/monolog suggests installing mlehner/gelf-php (Allow sending log messages to a GrayLog2 server)
pagerfanta/pagerfanta suggests installing doctrine/orm (2.*)
pagerfanta/pagerfanta suggests installing doctrine/mongodb-odm (2.*)
pagerfanta/pagerfanta suggests installing solarium/solarium (2.*)
Writing lock file
Generating autoload files
外部ライブラリ導入前と導入後を比較してみました。
$ cd ..
$ ls -R BEAR.Sunday>List3
$ diff List2 List3>diff23
$ cat diff23
6a7
> composer.lock
11a13
> vendor
559a562,5967
>
> BEAR.Sunday/vendor:
> Aura
> BEAR
> Ray
> autoload.php
> composer
> doctrine
> facebook
> guzzle
> monolog
> pagerfanta
> smarty
> symfony
> vdump
>
・・・以下略
composer.lockとvenderが追加されたようで外部ライブラリの入れ直しではこの2つの削除でOKかな?
sandboxアプリのtmp, logディレクトリの権限を変更しておきます。
$ cd BEAR.Sunday
$ chmod -R 777 apps/sandbox/tmp apps/sandbox/log
phpunit関係の導入。
auto_discoverをonにして 新規チャネルを自動的に探すように設定。
$ sudo pear config-set auto_discover 1
config-set succeeded

$ sudo pear install pear.phpunit.de/PHPUnit
Attempting to discover channel "pear.phpunit.de"...
downloading channel.xml ...
Starting to download channel.xml (804 bytes)
....done: 804 bytes
Auto-discovered channel "pear.phpunit.de", alias "phpunit", adding to registry
Attempting to discover channel "pear.symfony-project.com"...
downloading channel.xml ...
Starting to download channel.xml (865 bytes)
...done: 865 bytes
Auto-discovered channel "pear.symfony-project.com", alias "symfony", adding to registry
Did not download optional dependencies: phpunit/PHP_Invoker, use --alldeps to download automatically
phpunit/PHPUnit can optionally use package "phpunit/PHP_Invoker" (version >= 1.1.0)
phpunit/PHP_CodeCoverage can optionally use PHP extension "xdebug" (version >= 2.0.5)
phpunit/PHPUnit_MockObject can optionally use PHP extension "soap"
downloading PHPUnit-3.6.11.tgz ...
Starting to download PHPUnit-3.6.11.tgz (119,171 bytes)
...done: 119,171 bytes
downloading File_Iterator-1.3.1.tgz ...
Starting to download File_Iterator-1.3.1.tgz (5,157 bytes)
...done: 5,157 bytes
downloading Text_Template-1.1.1.tgz ...
Starting to download Text_Template-1.1.1.tgz (3,622 bytes)
...done: 3,622 bytes
downloading PHP_CodeCoverage-1.1.2.tgz ...
Starting to download PHP_CodeCoverage-1.1.2.tgz (132,552 bytes)
...done: 132,552 bytes
downloading PHP_Timer-1.0.2.tgz ...
Starting to download PHP_Timer-1.0.2.tgz (3,686 bytes)
...done: 3,686 bytes
downloading PHPUnit_MockObject-1.1.1.tgz ...
Starting to download PHPUnit_MockObject-1.1.1.tgz (19,897 bytes)
...done: 19,897 bytes
downloading YAML-1.0.6.tgz ...
Starting to download YAML-1.0.6.tgz (10,010 bytes)
...done: 10,010 bytes
downloading PHP_TokenStream-1.1.3.tgz ...
Starting to download PHP_TokenStream-1.1.3.tgz (9,860 bytes)
...done: 9,860 bytes
install ok: channel://pear.phpunit.de/File_Iterator-1.3.1
install ok: channel://pear.phpunit.de/Text_Template-1.1.1
install ok: channel://pear.phpunit.de/PHP_Timer-1.0.2
install ok: channel://pear.symfony-project.com/YAML-1.0.6
install ok: channel://pear.phpunit.de/PHP_TokenStream-1.1.3
install ok: channel://pear.phpunit.de/PHP_CodeCoverage-1.1.2
install ok: channel://pear.phpunit.de/PHPUnit_MockObject-1.1.1
install ok: channel://pear.phpunit.de/PHPUnit-3.6.11

$ sudo pear install phpunit/DbUnit
downloading DbUnit-1.1.2.tgz ...
Starting to download DbUnit-1.1.2.tgz (41,895 bytes)
............done: 41,895 bytes
install ok: channel://pear.phpunit.de/DbUnit-1.1.2
$ sudo pear install phpunit/PHP_Invoker
downloading PHP_Invoker-1.1.0.tgz ...
Starting to download PHP_Invoker-1.1.0.tgz (3,727 bytes)
....done: 3,727 bytes
install ok: channel://pear.phpunit.de/PHP_Invoker-1.1.0

$ sudo pear install phpunit/PHP_Invoker
downloading PHP_Invoker-1.1.0.tgz ...
Starting to download PHP_Invoker-1.1.0.tgz (3,727 bytes)
....done: 3,727 bytes
install ok: channel://pear.phpunit.de/PHP_Invoker-1.1.0
phpunitテストを実行するためにデータベースの準備を行う。
アプリ用DB blogbearとテスト用DB blogbeartestをCREATEする。
$ sudo mysql
Welcome to the MySQL monitor.  Commands end with ; or \g.
Your MySQL connection id is 3
Server version: 5.5.24 MySQL Community Server (GPL)

Copyright (c) 2000, 2011, Oracle and/or its affiliates. All rights reserved.

Oracle is a registered trademark of Oracle Corporation and/or its
affiliates. Other names may be trademarks of their respective
owners.

Type 'help;' or '\h' for help. Type '\c' to clear the current input statement.

mysql> show databases;
+--------------------+
| Database           |
+--------------------+
| information_schema |
| mysql              |
| performance_schema |
| test               |
+--------------------+
4 rows in set (0.00 sec)

mysql> CREATE DATABASE `blogbear` DEFAULT CHARACTER SET 'utf8';
Query OK, 1 row affected (0.00 sec)

mysql> CREATE DATABASE `blogbeartest` DEFAULT CHARACTER SET 'utf8';
Query OK, 1 row affected (0.00 sec)

mysql> show databases;
+--------------------+
| Database           |
+--------------------+
| information_schema |
| blogbear           |
| blogbeartest       |
| mysql              |
| performance_schema |
| test               |
+--------------------+
6 rows in set (0.00 sec)

mysql> quit
Bye
データベースblogbearにpostsテーブルを作成しダミーデータを投入する。
$ sudo mysql blogbear
Welcome to the MySQL monitor.  Commands end with ; or \g.
Your MySQL connection id is 5
Server version: 5.5.24 MySQL Community Server (GPL)

Copyright (c) 2000, 2011, Oracle and/or its affiliates. All rights reserved.

Oracle is a registered trademark of Oracle Corporation and/or its
affiliates. Other names may be trademarks of their respective
owners.

Type 'help;' or '\h' for help. Type '\c' to clear the current input statement.

mysql> CREATE TABLE posts (
    -> id INT UNSIGNED AUTO_INCREMENT PRIMARY KEY,
    -> title VARCHAR(50),
    -> body TEXT,
    -> created DATETIME DEFAULT NULL,
    -> modified DATETIME DEFAULT NULL
    -> );
Query OK, 0 rows affected (0.04 sec)

mysql> INSERT INTO posts (title,body,created)
    -> VALUES ('タイトル', 'これは、記事の本文です。', NOW());
Query OK, 1 row affected (0.00 sec)

mysql> INSERT INTO posts (title,body,created)
    -> VALUES ('またタイトル', 'そこに本文が続きます。', NOW());
Query OK, 1 row affected (0.01 sec)

mysql> INSERT INTO posts (title,body,created)
    -> VALUES ('タイトルの逆襲', 'こりゃ本当に面白そう!うそ。', NOW());
Query OK, 1 row affected (0.01 sec)

mysql> show tables;
+--------------------+
| Tables_in_blogbear |
+--------------------+
| posts              |
+--------------------+
1 row in set (0.00 sec)

mysql> select * from posts;
+----+-----------------------+--------------------------------------------+---------------------+----------+
| id | title                 | body                                       | created             | modified |
+----+-----------------------+--------------------------------------------+---------------------+----------+
|  1 | タイトル              | これは、記事の本文です。                   | 2012-07-08 10:17:18 | NULL     |
|  2 | またタイトル          | そこに本文が続きます。                     | 2012-07-08 10:17:18 | NULL     |
|  3 | タイトルの逆襲        | こりゃ本当に面白そう!うそ。               | 2012-07-08 10:17:19 | NULL     |
+----+-----------------------+--------------------------------------------+---------------------+----------+
3 rows in set (0.00 sec)

mysql> quit
Bye
データベースblogbeartestにpostsテーブルを作成する。$ sudo mysql blogbeartest
Welcome to the MySQL monitor. Commands end with ; or \g.
Your MySQL connection id is 8
Server version: 5.5.24 MySQL Community Server (GPL)
Copyright (c) 2000, 2011, Oracle and/or its affiliates. All rights reserved.
Oracle is a registered trademark of Oracle Corporation and/or its
affiliates. Other names may be trademarks of their respective
owners.
Type 'help;' or '\h' for help. Type '\c' to clear the current input statement.
mysql> CREATE TABLE posts (
-> id INT UNSIGNED AUTO_INCREMENT PRIMARY KEY,
-> title VARCHAR(50),
-> body TEXT,
-> created DATETIME DEFAULT NULL,
-> modified DATETIME DEFAULT NULL
-> );
Query OK, 0 rows affected (0.03 sec)
mysql> show tables;
+------------------------+
| Tables_in_blogbeartest |
+------------------------+
| posts |
+------------------------+
1 row in set (0.00 sec)
mysql> quit
Bye
テスト実行準備が終わったのでphpunitテストを実行する。$ cd ~/BEAR/BEAR.Sunday $ phpunit PHPUnit 3.6.11 by Sebastian Bergmann. The Xdebug extension is not loaded. No code coverage will be generated. run:sandbox mode=Dev cahce=enable ............................................. Time: 4 seconds, Memory: 17.25Mb OK (45 tests, 55 assertions)sandboxを実際にビルトインサーバーで実行して挙動をブラウザから確認する。
$ php -S localhost:8088 web.php
PHP 5.4.4 Development Server started at Sun Jul  8 10:57:08 2012
Listening on localhost:8088
Document root is /home/shige/BEAR/BEAR.Sunday/apps/sandbox/htdocs
Press Ctrl-C to quit.
[Sun Jul  8 10:57:26 2012] run:sandbox mode=Dev cahce=enable
[Sun Jul  8 10:57:26 2012] ::1:42119 [200]: /assets/css/bootstrap.css
[Sun Jul  8 10:57:26 2012] ::1:42120 [200]: /assets/css/bootstrap-responsive.css
[Sun Jul  8 10:57:26 2012] ::1:42121 [200]: /assets/js/jquery.js
[Sun Jul  8 10:57:26 2012] ::1:42122 [200]: /assets/js/bootstrap-tooltip.js
[Sun Jul  8 10:57:26 2012] ::1:42123 [200]: /assets/js/bootstrap-popover.js
[Sun Jul  8 10:57:26 2012] ::1:42124 [200]: /assets/js/bootstrap-collapse.js
[Sun Jul  8 10:57:26 2012] ::1:42125 [200]: /assets/js/bootstrap-tab.js
[Sun Jul  8 10:57:26 2012] ::1:42126 [200]: /assets/ico/favicon.ico
[Sun Jul  8 10:57:26 2012] ::1:42128 [200]: /assets/img/glyphicons-halflings.png
[Sun Jul  8 10:57:26 2012] ::1:42129 [200]: /assets/ico/favicon.ico
[Sun Jul  8 10:58:03 2012] run:sandbox mode=Dev cahce=enable
[Sun Jul  8 10:58:03 2012] ::1:42133 [200]: /assets/css/bootstrap.css
[Sun Jul  8 10:58:03 2012] ::1:42134 [200]: /assets/js/bootstrap-tooltip.js
[Sun Jul  8 10:58:03 2012] ::1:42135 [200]: /assets/js/bootstrap-popover.js
[Sun Jul  8 10:58:03 2012] ::1:42136 [200]: /assets/js/bootstrap-collapse.js
[Sun Jul  8 10:58:03 2012] ::1:42137 [200]: /assets/js/bootstrap-tab.js
・・・以下略
ブラウザからアクセスしてページ内容を確認。

起動時に指定したweb.phpがhttp://localhost:8088/へのアクセスで表示される。ページ内にあるリンクからHelloworldを表示する。

ちゃんとHelloWorldページが表示された。

こちらはblogbearの一覧表示画面。
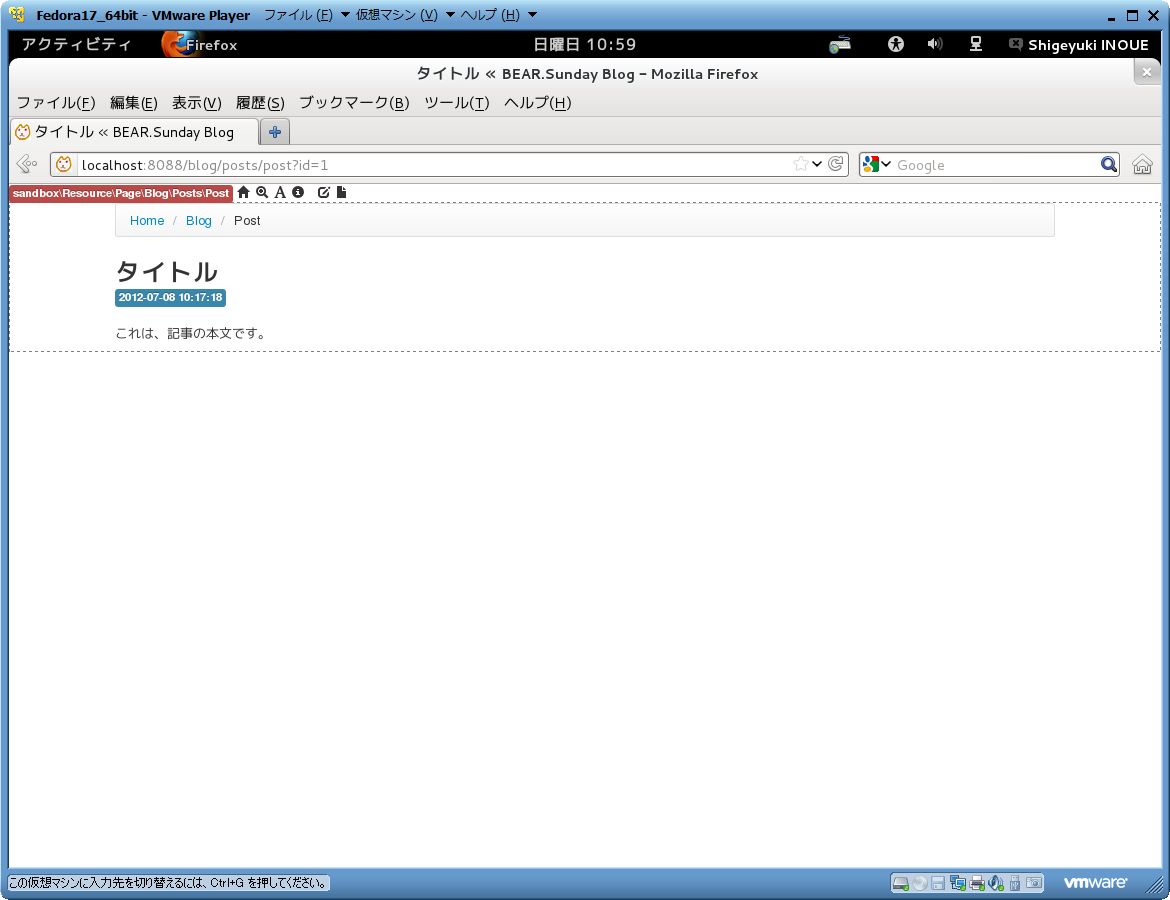
個々の記事を表示する画面。

最後に記事編集画面。新規ページと供用されていると思われる。
以上BEAR.Sundayをgithubから取得しphpunitテストを実行して確認。実際にビルトインサーバにブラウザからアクセスして表示等を確認した。
PHPはかなり不慣れで戸惑う場面も多かったしまだ納得いってない挙動もあるが同様にUbuntu12.04やDebian Wheezy(現testing)でも環境を構築してみたので随時記事にしたいと思う。
登録:
投稿 (Atom)